Showing posts with label blue. Show all posts

Sunday, October 27, 2013

Sally Hansen Triple Shine

Hey guys,

So I totally lied about keeping this blog updated, I am a total fail sorry!  I guess I will just post when I feel like it at this point... Anyways I picked up two of the new Sally Hansen Triple Shine polishes yesterday and I knew I had to post about them.  I grabbed Wavy Blue and Hypnautical.  The colors in this collection all look super awesome, there were some glitters that I will definitely be going back for soon but I wanted to see how I liked them first.  Wavy Blue is a pretty blue with a slight purple shift it has like really micro glitter in it, it is almost looks like a foil but I wouldn't call it that.  Hypnautical is a blue to green shifting glitter with blue to green shifting Mylar shards in it.  I got this one because it is seriously a gorgeous polish but I was worried the shads were going to stick up and that it was going to be awful to work with.  To my surprise the shards are thin and lay really flat to the nail!  I am so happy about this I have had horrible experience with these kind of polishes before.  Also I apoligize for the not so great pics these bottles are super awkward to hold and I am out of practice with my nail posing haha.


Wavy Blue on its own


Hypnautical over Wavy Blue


Hypnautical is really hard to capture it is really glowy in real life!


Friday, August 23, 2013

Update

Hey guys,

So sorry I haven't posted in almost a month!  My work schedule is a little redic right now and my kiddo has just gone back to school so I have been super busy.  I am hoping to get a few posts up early next week, one being the fan brush watercolor tutorial.  But for now I can post a couple phone pics I have taken of some recent mani's.  Sorry the quality is not awesome on these, I really wish I had taken the time to get proper pics of them!


First up is a mani I got from this tutorial by MrCandiipants on YouTube.  I used Maybelline Canary Cool as my base, my watercolor colors are Essie Tart Deco, Finger Paints Lemon Sour, Sinful Colors Orange Cream, Orly Terracotta and my orange pastel neon franken, and the dots are also Canary Cool


Second is Wet N Wild I Need a Refresh-mint (new version I will do a comp soon) and Revlon Whimsical, this is pretty similar to several mani's I have done before but I am a sucker for Whimsical over pastel mints and blues!


Thursday, August 1, 2013

Pastel Matte Galaxy Nails

Hey guys,

So sorry I have not been posting much lately, I am going to really try to get some stuff up really soon!  Today I have some nail art inspired by The Nailasaurus yet again, she just has the cutest nail designs I am a little obsessed with her nails at the moment.  She posted a Pastel Galaxy Tutorial about a week ago and I was I knew I had to recreate this mani.  I like the finished design but I was terrible at painting the little stars so please forgive me for how horrible they look.  I hope you enjoy!


Colors used:  Essie Navigate Her (base), China Glaze Lemon Fizz, OPI Do You Lilac It?, China Glaze For Audrey, Zoya Charla, China Glaze Fast Track, white acrylic paint, and Hard Candy Matte-ly In Love


Thursday, July 25, 2013

Fan Brush Tie Dye Nail Art

Hey guys,

So I am not really sure what to call these nail at the moment but I am going with fan brush tie dye for right now.  I am in love with this look and it is so simple it is not even funny.  I got the inspiration for this nail design from a dress I had bought for an event at work.  It had a really pretty blue and pink watercolor look in parts of the fabric and it made me want to try for something like it on my nails.  I started with and off-white base and did two coats of that and top coated it.  I let it dry for about ten minutes then I grabbed a pastel neon blue and pink polish, a fan brush and some pure acetone.  I just placed a big drop of the polish color on a paper plate and then I dipped my fan brush into the acetone and thinned out the polish till it got a watercolor look to it.  I then just randomly dapped the thinned polish onto my nails.  I will probably do a more detailed picture tutorial on these soon so I can explain better how I got this look.  I hope you all enjoy!

Colors used: OPI My Vampire is Buff and my past blue and pink neon frankens


Wednesday, July 24, 2013

Sally Hansen HD Blu

Hey guys,

I am back!  Sorry for the lack of posts, still trying to get settled into my new job.  Today I have a freakin awesome polish combo to show you all.  I have had several of the Sally Hansen HD polishes for a while they were discontinued last year I think and I never use them.  So I thought I would try a layering combo with Blu which is an amazing shimmery blue with a very slight purple duo-chrome.  I went with the lovely Sinful Colors Endless Blue as my base coat, I only needed one thickish coat to get it opaque, and layered one coat of Blue over that.


Thursday, July 11, 2013

80's Inspired Nail Art

Hey guys,

So some of my favorite bloggers have been doing some awesome nail art and I have become so inspired by them!  This mani is loosely inspired by Chalkboard Nails Hipster Mix and Match post, I really loved the color combination she chose and the little overlapped 3-D looking dots she did were so cool looking I had to give them a try.  Also I hate how my pinky turned out, I really should have redone it but I was too lazy to do that.

Colors used: Sally Hansen Xtreme Wear Coral Reef, Color Club Pucci-Licious, Essie In the Cab-ana, and a white striper polish


Wednesday, July 10, 2013

Waterfall Nail Art Inspired by The Nailasaurus

Hey guys,

So The Nailasaurus has posted a few of these Waterfall Nail Art and I loved the blue one that she posted so I decided to give it a try myself.  She hasn't put a tutorial up for it and this was so my first time trying this out so mine is not near as perfect as hers, but I still like how they turned out and I think these will be easier to do the second time around.  Hope you all enjoy!


Colors used: China Glaze Bahamian Escape, Gothic Lolita, Fancy Pants, and Secret Periwinkle and Wet N Wild Hallucinate


Tuesday, July 9, 2013

Tutorial: Madeline Poole Inspired Flowers

Hey guys,

So I posted my Madeline Poole Flowers mani about a week ago and I thought I would do a tutorial on them for you all.  It is a great nail art design for beginners and they look so cute!   The only supplies you will need are a few polishes a dotting tool, and a nail art brush.


Colors used:  Sally Hansen Complete Salon Manicure Without a Stitch, Essie In the Cab-ana, First Timer and Mojito Madness, China Glaze White On White and Sally Girl Get Out!


Step One:  Paint your nails a base color, I would suggest a white, off-white or a nude.  Pick two colors for your flowers, a white for the middle of the flower and a green for the leaves

Step Two:  Give your base color 30 minutes to dry or apply a quick dry topcoat and wait about 5 minutes. Pick one of your flower colors place a drop on a piece of paper and grab your dotting tool.  Make little half circles in a two to four spots around your nail, make sure you space them well so that you can fit the other side of your flower on in a minute.

Step Three: Grab your other flower color and do a half circle on the other side of the half circles you just did to make a little flower shape.  These do not have to be perfect looking.

Step Four:  Grab your white and with your dotting tool place a small dot in the center of your flowers

Step Five:  Get your green polish and your nail art brush and paint small leaves around your flowers, I did two leaves for each flower.  These again don't have to be perfect, I am not great at drawing leaves as you can see.

Step Six: Wait about 5 minutes and apply a quick dry topcoat, I would recommend Seche Vite because it will not smear your design


Oh and I did an accent nail as well, this is a coat of In the Cab-ana and Sally Girl Get Out! (fyi in love with this glitter!)


Monday, July 8, 2013

Dupe Alert!

Hey guys,

So I popped into my local Sally's the other day to grab some acetone and I looked at there display of Sally Girl polishes.  I had seen a post on MakeupAlley about a few new colors they had in the line I wanted to see if any of them were interesting.  First off if you have never checked those little polishes out then you really should even though they are tiny there are some really nice colors and formulas.  I found several new ones a pretty turquoise glitter which you will see in another post and a dupe for Deborah Lippmann Mermaid's Dream are the two that I picked up but there was also a pretty black with some gorgeous glitter in it that I want to go back and get too.  Now I do not own Mermaid's Dream but from swatches this one is pretty dead on, and I actually think I would prefer this one because it appears to be a lot smoother than the Deborah Lippmann one. I used a light mint base so I didn't have to do too many coats but I don't think that changed the final color of the polish .


Colors used: One coat of China Glaze Keep Calm Paint On and Sally Girl Brainy


Sunday, July 7, 2013

Tutorial: Multi-Colored Water Spotted Nails

Hey guys,

So I did a multi-color water spotted mani a week or two ago and when I posted it on Beautylish someone suggested that I do a tutorial for it.  I thought this was a pretty good idea because I haven't seen any out there for using more than one color in a water spotted mani.  If you have never done a water spotted mani or would like to see a video on how it is done then please visit CutePolish on YouTube.  I hope you all find this helpful!


Colors used: Orly Pure Porcelain, Sally Hansen Xtreme Wear Pacific Blue and Twisted Pink, and Wet N Wild On A Trip


Step One:  Paint your nails a base color, I would suggest a white or off-white for this.  Also apply a little Vaseline or some tape around your fingers to help aid in clean up later.

Step Two: Get a cup a fill it to the top with room temperature water, make sure it is a cup you are not going to be drinking out of again. Oh and do not use a Styrofoam cup the nail polish will melt it! Pick three  colors for your water spots.  Now take one of the colors drip a dot of polish onto the surface of the water.  Spray it with some kind of alcohol based spray about 4-5 inches away (you can use body spray, anti-bacterial spray, hairspray).  I usually spray between 1-3 times, it depends on how well the polish start to separate.

Step Three: Repeat step two with your other two colors.  

Step Four:  Remove the tape or wipe the Vaseline and nail polish off your skin and clean up any other polish with a q-tip or brush and some acetone.  Top coat your look and you should be done!

A couple of tips if you have never done water spotted nails before.
1.It can be a bit tricky to do at first, I find that I like to only work with one drop of polish, especially when doing more than one color for the spots.  I also find that when I do more than one drop it seems to not want to separate once I spray the body spray. 
2. And on the topic of body spray I would highly suggest you do not use aerosol hairspray, I have tried it once and the spray was too powerful it pretty much blew the nail polish out of my cup of water.  
3. It is important that the water you use is room temp, if it is too cold the polish dries very quickly and you will have issues with getting it to spot.


Saturday, July 6, 2013

A Few Random Mani's

Hey guys,

So a have several mani's that I never got around to posting or that I didn't really like how they photographed,  looked etc.  I decided I would do a little spam post for you all with them.  I hope you enjoy!


Watercolor nails with a glitter cross accent, I hated how this one photographed the colors were not showing up well at all


Oklahoma Love mani, I used Gumdrop as the base and acrylic paint for the Oklahoma outline and the heart


Tribal mani, trying to do something inspired by Mr. Candiipants but I totally did not fill in that middle finger very well at all and I didn't see it till I took pics. I used Sinful Colors Bikini and a black striper polish


China Glaze Keep Calm and Paint On with little gems as and accent


Orly Royal Navy, this one is impossible for me to photograph good, it always shows visible nail line and in real life it was not noticeable at all


Orly Rage and Cotton Candy tape mani, I just wasn't sure how much I liked this one, I do love the color combo though


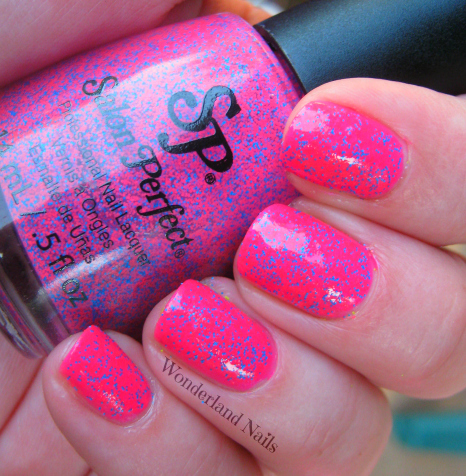
Salon Perfect Shocked over Sinful Colors Bikini, I kept forgetting to post this one and it also is not photographing very color accurate it is a lighter pink


Monday, July 1, 2013

Fourth of July!

Hey guys,

I have a fun easy Fourth of July mani for everyone today.  I love doing Fourth mani's but I will kinda make myself sick of them after a while haha.  Anyways I wanted to do something simple but glittery and I came up with this combo.  I hope you enjoy!


Colors used: Sinful Colors Endless Blue, OPI Pirouette My Whistle, Zoya Maura and LA Girl Glitter Addict Animate


Thursday, June 27, 2013

Kaboom!

Hey guys,

I have one of the Salon Perfect Neon Collision polishes to show you all today.  This one is Kaboom, it is a dupe for Ninja Polish Floam, it is a neon green and blue matte glitter polish.  I love that a drugstore brand duped such a unique and fun indie polish.  I have wanted Floam for a while but I kinda hate messing with ordering indie polishes so I just avoided getting it.  The Neon Collision collection has a bunch of different neon glitter polishes in different color combos which is great!  I got this one and Shocked (which I will show you all tomorrow probably) because they were the only two polishes that I knew I would personally wear.  When I first tried these out I didn't use a base for them, fyi big mistake, they look a million times better with a        colored polish under them.  I really love the color combo I chose for this one and I can't wait to try more.


Colors used: OPI Did It On Em' and Salon Perfect Kaboom


Monday, June 24, 2013

Whimsical Gradient

Hey guys,

I was bored the other night and was randomly googling nail polish colors and came across Revlon Whimsical.  I have completely forgotten about this color for some reason and I decided I had to use it asap.  I would rate Whimsical as one of my top ten maybe even top five favorite polishes.  It looks so pretty over so many different colors and I especially love it over turquoise and blues.  For this mani I wanted to do something fun and different from some of the other Whimsical mani's I have done.  I did a gradient of purple and blue on my ring, middle and thumb, and then used just the purple on my pinky and the blue on my index finger.  I love how this turned out and the gradient with these two colors was kind of perfection.  I hope you enjoy!

Colors used: Essie In the Cab-ana, my neon franken and Revlon Whimsical


Saturday, June 22, 2013

Multi-Colored Water Spotted

Hey guys,

So when I tried the water spotted nails the other day I thought that it might be cool to see what it would look like if I did a few different colors.  This one was definitely trial and error, I had a hard time getting the color to spot at first and I was trying to use hairspray but it was not working well.  I figured out that if I did just one drop of the nail color onto the water and then sprayed with body spray I got the polish to separate better.  I did one color at a time and I thought it looked pretty cool once I was done with it.


Colors used: base, Orly Pure Porcelain, China Glaze Electric Pineapple, Sinful Colors Why Not and Bikini


Friday, June 21, 2013

Water Spotted Nails

Hey guys,

So I decided to try out the water spotted technique that everyone has been doing lately.  I  first saw this when Cute Polish on YouTube posted a video on it several months ago.  If you would like to watch the video go here.  The technique starts off very similar to water marble nails using a cup of water and dripping polish on the surface of the water.  But for this you use only one color and you will need some kind of alcohol based spray (hairspray, body spray) I used a body spray but I think next time I will try hairspray to see if I get a different result.  You drop the polish one drop at a time until it spreads over the surface of the water, I did three to four drops for each nail, after you have the polish in the cup you need to spray the surface with your alcohol based spray.  This will cause the polish to separate and that is how you get the spotted look.  This was my first time doing this and I seemed to have a hard time get the polish to actually spot, I think my water was a little to cold for one and I think I should try a different spray next time.  Anyways this was actually super easy to do and you get such a cool look from it!  Make sure you cover the skin and some of your fingers with tape or Vaseline before you do this because you will get polish all over your fingers and it is HORRIBLE to clean up.


Colors used:  Orly Royal Navy and Orly Dazzle