Showing posts with label coral. Show all posts

Friday, August 23, 2013

Update

Hey guys,

So sorry I haven't posted in almost a month!  My work schedule is a little redic right now and my kiddo has just gone back to school so I have been super busy.  I am hoping to get a few posts up early next week, one being the fan brush watercolor tutorial.  But for now I can post a couple phone pics I have taken of some recent mani's.  Sorry the quality is not awesome on these, I really wish I had taken the time to get proper pics of them!


First up is a mani I got from this tutorial by MrCandiipants on YouTube.  I used Maybelline Canary Cool as my base, my watercolor colors are Essie Tart Deco, Finger Paints Lemon Sour, Sinful Colors Orange Cream, Orly Terracotta and my orange pastel neon franken, and the dots are also Canary Cool


Second is Wet N Wild I Need a Refresh-mint (new version I will do a comp soon) and Revlon Whimsical, this is pretty similar to several mani's I have done before but I am a sucker for Whimsical over pastel mints and blues!


Tuesday, July 16, 2013

Floral Nail Art

Hey guys,

So I am super happy today, I just got a new job!  There may not be as many posts coming up since I am starting my new job tomorrow, but I will try and post at least three times a week.  Anyways, today I have some another floral nail art design, I used the same technique as my Hawaiian Style Flowers post.  I love this nail art because it is so easy and requires very little skill to do and it looks really pretty.  Hope you all enjoy.

Colors used:  Orly Pure Porcelain, neon coral, pink and red frankens, Color Club Twiggie, and Orly Lucky Duck


Thursday, July 11, 2013

80's Inspired Nail Art

Hey guys,

So some of my favorite bloggers have been doing some awesome nail art and I have become so inspired by them!  This mani is loosely inspired by Chalkboard Nails Hipster Mix and Match post, I really loved the color combination she chose and the little overlapped 3-D looking dots she did were so cool looking I had to give them a try.  Also I hate how my pinky turned out, I really should have redone it but I was too lazy to do that.

Colors used: Sally Hansen Xtreme Wear Coral Reef, Color Club Pucci-Licious, Essie In the Cab-ana, and a white striper polish


Sunday, June 16, 2013

Impressionist/Abstract Flowers Tutorial

Hey guys,

So while updating my blog and changing the name and everything I realized I don not have enough tutorials!  I figured I would start with my abstract/ impressionist flowers that I have done a few times.  These are actually very easy to do and are pretty much mistake proof.  You will need pure acetone, some kind of small glass container to put some acetone in, a small nail art brush, a white or off-white base, three "flowery" colored nail polishes, a green and some topcoat.  

Colors used:  base- Orly Pure Porcelain, flowers- China Glaze Dance Baby & Fuchsia Fanatic, and Sally Hansen Xtreme Wear Coral Reef, leaves- an unnamed Creative Arts green  (dupe to Color Club Twiggie)


Step One: Paint your nails a white or off-white base color and then apply a fast drying topcoat.This is important because we will be using acetone to make the flowers and the topcoat creates a barrier so we don't lift any of the base coat off as we are painting the flowers.

Step Two: Pour some acetone into your glass container and put a drop of one of  your flower colors onto a paper plate.  Dip your nail art brush into the acetone and then mix it into some of the polish you put on the plate, you want the polish to be pretty thinned out by the acetone so you may have to dip the brush back into it a few times to get enough.  Once you mix the polish and acetone begin painting flower like shapes onto your nails.

Step Three:  Continue painting your flowers with the other colors you have chosen, it really doesn't matter if you do perfect looking flower shapes, after the first color I really just kinda haphazardly place the color onto the nail in different spots to balance the look out.

Step Four: Grab your green polish and again thin a blob of it with your acetone and paint it anywhere you have open spaces on the nail.  I would try to avoid overlapping it with the flower colors as much as you can because it can make them look a little muddy. Once you have finished with the leaves you can apply your topcoat.  I like to do the topcoat pretty much right after I am done because it helps to blend the colors even more and gives it a more impressionist style look.

A couple of tips, you should not need very much polish for the flowers and leaves, using the acetone helps because even if the polish gets a bit thick you can still use it since you are thinning it with acetone.  The polish should not be opaque when you are painting the flowers and leaves it should look like watercolors.  If you do feel that you made a mistake you can take your brush and wash it off then dip it into the acetone a lightly brush wear you have messed up and it should take the polish off without removing your base color.

I hope you all like this tutorial and if you have any questions please feel free to leave a comment or e-mail me!


Sunday, March 10, 2013

Striping Tape Experiment

Hey guys,

So I made a franken the other day with China Glaze Flip Flop Fantasy.  My Flip Flop Fantasy was getting really low and I decided I would get a new one and just have some fun with the rest of it.  I added white and a little bit of a neon orange and the color turned out gorgeous!  So I did a mani with my franken and the topped it with China Glaze White Cap.  I was bored and decided to play with my striping tape I went with another neon, Nina Ultra Pro Pearly Brights.  Pearly Brights isn't that far off from my franken color so it was nice subtle look (if you call crazy bright coral neon subtle haha).


Wednesday, January 30, 2013

Creamsicle Gradient

Hey guys,

I finally did another gradient!  It feels like I haven't done one in forever, I love doing gradients I think they are so pretty.  I wanted something girly for this one so I went with pink and coral.  I used OPI Pink Friday and Finger Paints Gimme Some Sugar then topped the gradient off with Sinful Colors Pinky Glitter.


Saturday, January 19, 2013

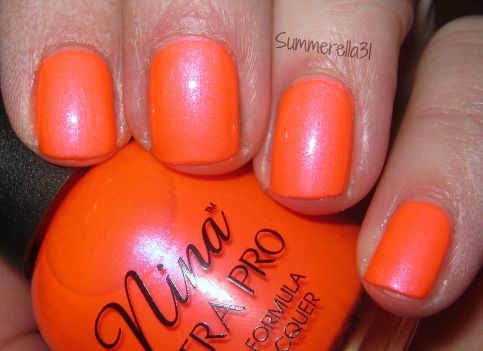
Pearly Brights

Hey guys,

I grabbed this polish at Sally's the other day and I am in love with it!  It's Nina Ultra Pro Pearly Brights, a gorgeous coral leaning pink neon with shimmer.  I don't know how this one has never caught my eye before.  It is super neon and the color is so lovely.  The formula was really nice on this one, especially for a neon.  I did 3 coats but if you are careful two would be fine.  Also I am sorry for the dry fingers forgot to moisturize before taking pics and I had used acetone to remove my previous mani.


Friday, November 23, 2012

Make Some Noise

I grabbed this the other day, it came out with China Glaze's spring 2012 collection.  It's a red/coral color that leans more red than coral.  I love it, really nice formula and super shiny, almost jelly like shine but with full coverage.


Wednesday, August 22, 2012

Party Hearty

I got a few more Lush Lacquer's today!!  Seriously they have some super gorgeous glitters and I think I am officially obsessed with them.  I got three mini's and I will post the other two as my next two posts more than likely.

First up is Party Hearty, this has a coral jelly base with pretty gold micro-shimmer, there is small round matte red glitter, medium square blue and green glitter, medium round purple glitter, larger purple square glitter and a few larger blue heart shaped glitter (this makes this polish even cuter!).

I used one coat of Orly Cotton Candy and two coats of LL Party Hearty


Monday, August 13, 2012

Leopard Accent Mani

I did a cute leopard accent mani today.  Funny in the past I have tried the leopard thing before but was never able to get it to look right and then I decided to give it a try and it turned out really nice.  I think I will do a tutorial on this one soon.  I used Sally Hansen Xtreme Wear Coral Reef, Wet N Wild I Need A Refresh-mint, Revlon Whimsical and OPI I Juggle Men... 

Also sorry for the wrinkling of the black on the leopard spots it is I Juggle Men... it is really hard to work with and I really wish that I had not used it over the accent nails because it looked so good before I added that dang polish!


Friday, July 6, 2012

Pink Plumeria

I have a simple mani today. The other day I picked up China Glaze's Pink Plumeria from their summer neon's collection.  This one is interesting indoors it looks like a bright pastel neon coral leaning pink.  Outdoors it lean more neon pink and loses that pastel look that it has indoors.


I tried to get color accurate photos but this one is hard!  It photographs lighter than it is in real life but it isn't darker than traditional neon's imagine this color but not so pastel looking haha.


Wednesday, June 27, 2012

Neon To Nude Gradient

This is a really cute "on trend" manicure today.  Neon seems to be very popular this summer as well as nude colors and mixing them together is even better!  I like this a lot, although I think this will look best with a pink, red, coral, orange or yellow neons.  I feel like it would look odd with  green, purple or blue neon, but that could be just me haha.

I used Sally Hansen Complete Salon Manicure Without a Stitch as the nude (you could use any close to your skintone nude for this) and China Glaze Flip Flop Fantasy which is my favorite neon of all time.

I did a coat of Without a Stitch first then used the Sponged Gradient technique with Flip Flop Fantasy and Without a Stitch.


Wednesday, June 20, 2012

Coral Bombshell Gradient

I finally got my hands on China Glaze Blonde Bombshell!  I passed this up several times and then when I couldn't find it anymore I wanted it.  I ended up scoring it at Sally's while they were having their 50% off clearance sale so I ended up paying $1.50 for it I think.

I did a glitter gradient with it using Sally Hansen Xtreme Wear Coral Reef for the base and then used Blonde Bombshell for the gradient.  I love this mani so much!