Tuesday, July 9, 2013

Tutorial: Madeline Poole Inspired Flowers

Hey guys,

So I posted my Madeline Poole Flowers mani about a week ago and I thought I would do a tutorial on them for you all.  It is a great nail art design for beginners and they look so cute!   The only supplies you will need are a few polishes a dotting tool, and a nail art brush.


Colors used:  Sally Hansen Complete Salon Manicure Without a Stitch, Essie In the Cab-ana, First Timer and Mojito Madness, China Glaze White On White and Sally Girl Get Out!


Step One:  Paint your nails a base color, I would suggest a white, off-white or a nude.  Pick two colors for your flowers, a white for the middle of the flower and a green for the leaves

Step Two:  Give your base color 30 minutes to dry or apply a quick dry topcoat and wait about 5 minutes. Pick one of your flower colors place a drop on a piece of paper and grab your dotting tool.  Make little half circles in a two to four spots around your nail, make sure you space them well so that you can fit the other side of your flower on in a minute.

Step Three: Grab your other flower color and do a half circle on the other side of the half circles you just did to make a little flower shape.  These do not have to be perfect looking.

Step Four:  Grab your white and with your dotting tool place a small dot in the center of your flowers

Step Five:  Get your green polish and your nail art brush and paint small leaves around your flowers, I did two leaves for each flower.  These again don't have to be perfect, I am not great at drawing leaves as you can see.

Step Six: Wait about 5 minutes and apply a quick dry topcoat, I would recommend Seche Vite because it will not smear your design


Oh and I did an accent nail as well, this is a coat of In the Cab-ana and Sally Girl Get Out! (fyi in love with this glitter!)


Monday, July 8, 2013

Dupe Alert!

Hey guys,

So I popped into my local Sally's the other day to grab some acetone and I looked at there display of Sally Girl polishes.  I had seen a post on MakeupAlley about a few new colors they had in the line I wanted to see if any of them were interesting.  First off if you have never checked those little polishes out then you really should even though they are tiny there are some really nice colors and formulas.  I found several new ones a pretty turquoise glitter which you will see in another post and a dupe for Deborah Lippmann Mermaid's Dream are the two that I picked up but there was also a pretty black with some gorgeous glitter in it that I want to go back and get too.  Now I do not own Mermaid's Dream but from swatches this one is pretty dead on, and I actually think I would prefer this one because it appears to be a lot smoother than the Deborah Lippmann one. I used a light mint base so I didn't have to do too many coats but I don't think that changed the final color of the polish .


Colors used: One coat of China Glaze Keep Calm Paint On and Sally Girl Brainy


Sunday, July 7, 2013

Tutorial: Multi-Colored Water Spotted Nails

Hey guys,

So I did a multi-color water spotted mani a week or two ago and when I posted it on Beautylish someone suggested that I do a tutorial for it.  I thought this was a pretty good idea because I haven't seen any out there for using more than one color in a water spotted mani.  If you have never done a water spotted mani or would like to see a video on how it is done then please visit CutePolish on YouTube.  I hope you all find this helpful!


Colors used: Orly Pure Porcelain, Sally Hansen Xtreme Wear Pacific Blue and Twisted Pink, and Wet N Wild On A Trip


Step One:  Paint your nails a base color, I would suggest a white or off-white for this.  Also apply a little Vaseline or some tape around your fingers to help aid in clean up later.

Step Two: Get a cup a fill it to the top with room temperature water, make sure it is a cup you are not going to be drinking out of again. Oh and do not use a Styrofoam cup the nail polish will melt it! Pick three  colors for your water spots.  Now take one of the colors drip a dot of polish onto the surface of the water.  Spray it with some kind of alcohol based spray about 4-5 inches away (you can use body spray, anti-bacterial spray, hairspray).  I usually spray between 1-3 times, it depends on how well the polish start to separate.

Step Three: Repeat step two with your other two colors.  

Step Four:  Remove the tape or wipe the Vaseline and nail polish off your skin and clean up any other polish with a q-tip or brush and some acetone.  Top coat your look and you should be done!

A couple of tips if you have never done water spotted nails before.
1.It can be a bit tricky to do at first, I find that I like to only work with one drop of polish, especially when doing more than one color for the spots.  I also find that when I do more than one drop it seems to not want to separate once I spray the body spray. 
2. And on the topic of body spray I would highly suggest you do not use aerosol hairspray, I have tried it once and the spray was too powerful it pretty much blew the nail polish out of my cup of water.  
3. It is important that the water you use is room temp, if it is too cold the polish dries very quickly and you will have issues with getting it to spot.


Saturday, July 6, 2013

A Few Random Mani's

Hey guys,

So a have several mani's that I never got around to posting or that I didn't really like how they photographed,  looked etc.  I decided I would do a little spam post for you all with them.  I hope you enjoy!


Watercolor nails with a glitter cross accent, I hated how this one photographed the colors were not showing up well at all


Oklahoma Love mani, I used Gumdrop as the base and acrylic paint for the Oklahoma outline and the heart


Tribal mani, trying to do something inspired by Mr. Candiipants but I totally did not fill in that middle finger very well at all and I didn't see it till I took pics. I used Sinful Colors Bikini and a black striper polish


China Glaze Keep Calm and Paint On with little gems as and accent


Orly Royal Navy, this one is impossible for me to photograph good, it always shows visible nail line and in real life it was not noticeable at all


Orly Rage and Cotton Candy tape mani, I just wasn't sure how much I liked this one, I do love the color combo though


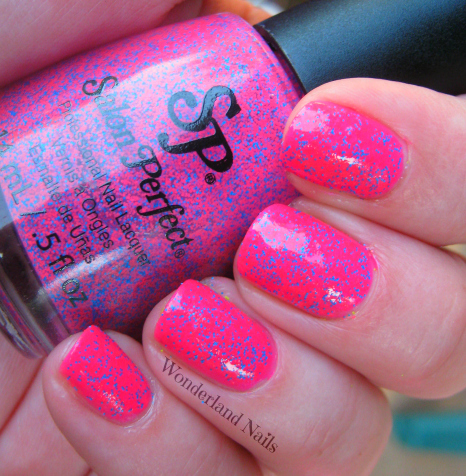
Salon Perfect Shocked over Sinful Colors Bikini, I kept forgetting to post this one and it also is not photographing very color accurate it is a lighter pink


Friday, July 5, 2013

Pastel Neon Orange Franken

Hey guys,

I am wearing another one of my neon franken's again today, I just love these and this orange one is probably one of my favorite next to the purple one that I did.  This color did not one to show up right when I photographed it though!  Really frustrating but it is not a mac and cheese orange, it is a little lighter and leans a tiny bit coral than what is showing in the pics.


Colors used: neon orange franken and Essie As Gold As It Gets


Flash, this one is way off on color accuracy


Natural light, closer but it's brighter and not as coral as this is showing


Natural light again this is closer than the first pic but it photographed way darker hear than in real life


Tuesday, July 2, 2013

Madeline Poole/Pshiiit Inspired Flowers

Hey guys,

So I was browsing Pshiiit's blog the other day and I saw her post about Madeline Poole's nail art book and one of the looks she had done from it.  I instantly knew I wanted to recreate this look, it was just so cute and looked really simple to do.  I didn't have the exact colors that she used but I tried to go with similar ones because I really thought it was a pretty combo.  Also I may do a tutorial on these flowers because they are very simple and look really cute!


Colors used: OPI My Vampire Is Buff, L'Oreal Sparklicious, my neon pink and orange franken, China Glaze White on White and Orly Glowstick


Monday, July 1, 2013

Fourth of July!

Hey guys,

I have a fun easy Fourth of July mani for everyone today.  I love doing Fourth mani's but I will kinda make myself sick of them after a while haha.  Anyways I wanted to do something simple but glittery and I came up with this combo.  I hope you enjoy!


Colors used: Sinful Colors Endless Blue, OPI Pirouette My Whistle, Zoya Maura and LA Girl Glitter Addict Animate