Showing posts with label green. Show all posts

Thursday, August 1, 2013

Pastel Matte Galaxy Nails

Hey guys,

So sorry I have not been posting much lately, I am going to really try to get some stuff up really soon!  Today I have some nail art inspired by The Nailasaurus yet again, she just has the cutest nail designs I am a little obsessed with her nails at the moment.  She posted a Pastel Galaxy Tutorial about a week ago and I was I knew I had to recreate this mani.  I like the finished design but I was terrible at painting the little stars so please forgive me for how horrible they look.  I hope you enjoy!


Colors used:  Essie Navigate Her (base), China Glaze Lemon Fizz, OPI Do You Lilac It?, China Glaze For Audrey, Zoya Charla, China Glaze Fast Track, white acrylic paint, and Hard Candy Matte-ly In Love


Tuesday, July 16, 2013

Floral Nail Art

Hey guys,

So I am super happy today, I just got a new job!  There may not be as many posts coming up since I am starting my new job tomorrow, but I will try and post at least three times a week.  Anyways, today I have some another floral nail art design, I used the same technique as my Hawaiian Style Flowers post.  I love this nail art because it is so easy and requires very little skill to do and it looks really pretty.  Hope you all enjoy.

Colors used:  Orly Pure Porcelain, neon coral, pink and red frankens, Color Club Twiggie, and Orly Lucky Duck


Monday, July 15, 2013

Watermelon Nail Art

Hey guys,

So I tried to do some watermelon nail art the other night, I thought it was going to be much easier to do than it was though.  I first used tape to do the triangle shape and then outlined the entire thing in black but I did not like the finished look.  I removed it and tried out something different on my thumb with less black and added white, I liked it much better so I started on my other nails.  I did not use tape this time, but just used a striping brush to paint out the triangle shape then filled the triangle in.  I added the tips of green, then the stripe of white.  I then outlined the watermelon shape with the black and added some seeds.  It was time consuming but I thought they turned out pretty cute.  Hope you enjoy!


Colors used: Sally Hansen Xtreme Wear Twisted Pink, Orly Green Apple, and white and black striper polish


Friday, July 12, 2013

Hawaiian Style Flowers

Hey guys,

I have a super cute flowers to show you all today, these are really pretty and super easy to do.  I used the tutorial my MrCandiipants to do this mani you can find the video  here. Oh and seriously if you have never watched her videos you need to she is super funny and her nail art is kind of epic!  I hope you enjoy


Colors used: OPI Skull and Glossbones, Revlon Top Speed Violet, my neon purple franken, Revlon Top Speed Luxe Laque, Orly Ancient Jade and Avon Nail Wear Pro Olive Green


Tuesday, July 9, 2013

Tutorial: Madeline Poole Inspired Flowers

Hey guys,

So I posted my Madeline Poole Flowers mani about a week ago and I thought I would do a tutorial on them for you all.  It is a great nail art design for beginners and they look so cute!   The only supplies you will need are a few polishes a dotting tool, and a nail art brush.


Colors used:  Sally Hansen Complete Salon Manicure Without a Stitch, Essie In the Cab-ana, First Timer and Mojito Madness, China Glaze White On White and Sally Girl Get Out!


Step One:  Paint your nails a base color, I would suggest a white, off-white or a nude.  Pick two colors for your flowers, a white for the middle of the flower and a green for the leaves

Step Two:  Give your base color 30 minutes to dry or apply a quick dry topcoat and wait about 5 minutes. Pick one of your flower colors place a drop on a piece of paper and grab your dotting tool.  Make little half circles in a two to four spots around your nail, make sure you space them well so that you can fit the other side of your flower on in a minute.

Step Three: Grab your other flower color and do a half circle on the other side of the half circles you just did to make a little flower shape.  These do not have to be perfect looking.

Step Four:  Grab your white and with your dotting tool place a small dot in the center of your flowers

Step Five:  Get your green polish and your nail art brush and paint small leaves around your flowers, I did two leaves for each flower.  These again don't have to be perfect, I am not great at drawing leaves as you can see.

Step Six: Wait about 5 minutes and apply a quick dry topcoat, I would recommend Seche Vite because it will not smear your design


Oh and I did an accent nail as well, this is a coat of In the Cab-ana and Sally Girl Get Out! (fyi in love with this glitter!)


Monday, July 8, 2013

Dupe Alert!

Hey guys,

So I popped into my local Sally's the other day to grab some acetone and I looked at there display of Sally Girl polishes.  I had seen a post on MakeupAlley about a few new colors they had in the line I wanted to see if any of them were interesting.  First off if you have never checked those little polishes out then you really should even though they are tiny there are some really nice colors and formulas.  I found several new ones a pretty turquoise glitter which you will see in another post and a dupe for Deborah Lippmann Mermaid's Dream are the two that I picked up but there was also a pretty black with some gorgeous glitter in it that I want to go back and get too.  Now I do not own Mermaid's Dream but from swatches this one is pretty dead on, and I actually think I would prefer this one because it appears to be a lot smoother than the Deborah Lippmann one. I used a light mint base so I didn't have to do too many coats but I don't think that changed the final color of the polish .


Colors used: One coat of China Glaze Keep Calm Paint On and Sally Girl Brainy


Saturday, July 6, 2013

A Few Random Mani's

Hey guys,

So a have several mani's that I never got around to posting or that I didn't really like how they photographed,  looked etc.  I decided I would do a little spam post for you all with them.  I hope you enjoy!


Watercolor nails with a glitter cross accent, I hated how this one photographed the colors were not showing up well at all


Oklahoma Love mani, I used Gumdrop as the base and acrylic paint for the Oklahoma outline and the heart


Tribal mani, trying to do something inspired by Mr. Candiipants but I totally did not fill in that middle finger very well at all and I didn't see it till I took pics. I used Sinful Colors Bikini and a black striper polish


China Glaze Keep Calm and Paint On with little gems as and accent


Orly Royal Navy, this one is impossible for me to photograph good, it always shows visible nail line and in real life it was not noticeable at all


Orly Rage and Cotton Candy tape mani, I just wasn't sure how much I liked this one, I do love the color combo though


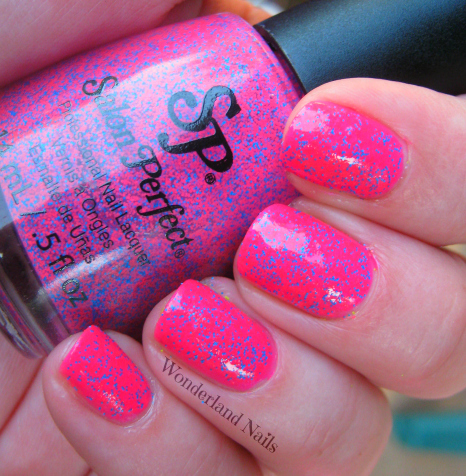
Salon Perfect Shocked over Sinful Colors Bikini, I kept forgetting to post this one and it also is not photographing very color accurate it is a lighter pink


Tuesday, July 2, 2013

Madeline Poole/Pshiiit Inspired Flowers

Hey guys,

So I was browsing Pshiiit's blog the other day and I saw her post about Madeline Poole's nail art book and one of the looks she had done from it.  I instantly knew I wanted to recreate this look, it was just so cute and looked really simple to do.  I didn't have the exact colors that she used but I tried to go with similar ones because I really thought it was a pretty combo.  Also I may do a tutorial on these flowers because they are very simple and look really cute!


Colors used: OPI My Vampire Is Buff, L'Oreal Sparklicious, my neon pink and orange franken, China Glaze White on White and Orly Glowstick


Thursday, June 27, 2013

Kaboom!

Hey guys,

I have one of the Salon Perfect Neon Collision polishes to show you all today.  This one is Kaboom, it is a dupe for Ninja Polish Floam, it is a neon green and blue matte glitter polish.  I love that a drugstore brand duped such a unique and fun indie polish.  I have wanted Floam for a while but I kinda hate messing with ordering indie polishes so I just avoided getting it.  The Neon Collision collection has a bunch of different neon glitter polishes in different color combos which is great!  I got this one and Shocked (which I will show you all tomorrow probably) because they were the only two polishes that I knew I would personally wear.  When I first tried these out I didn't use a base for them, fyi big mistake, they look a million times better with a        colored polish under them.  I really love the color combo I chose for this one and I can't wait to try more.


Colors used: OPI Did It On Em' and Salon Perfect Kaboom


Sunday, June 16, 2013

Impressionist/Abstract Flowers Tutorial

Hey guys,

So while updating my blog and changing the name and everything I realized I don not have enough tutorials!  I figured I would start with my abstract/ impressionist flowers that I have done a few times.  These are actually very easy to do and are pretty much mistake proof.  You will need pure acetone, some kind of small glass container to put some acetone in, a small nail art brush, a white or off-white base, three "flowery" colored nail polishes, a green and some topcoat.  

Colors used:  base- Orly Pure Porcelain, flowers- China Glaze Dance Baby & Fuchsia Fanatic, and Sally Hansen Xtreme Wear Coral Reef, leaves- an unnamed Creative Arts green  (dupe to Color Club Twiggie)


Step One: Paint your nails a white or off-white base color and then apply a fast drying topcoat.This is important because we will be using acetone to make the flowers and the topcoat creates a barrier so we don't lift any of the base coat off as we are painting the flowers.

Step Two: Pour some acetone into your glass container and put a drop of one of  your flower colors onto a paper plate.  Dip your nail art brush into the acetone and then mix it into some of the polish you put on the plate, you want the polish to be pretty thinned out by the acetone so you may have to dip the brush back into it a few times to get enough.  Once you mix the polish and acetone begin painting flower like shapes onto your nails.

Step Three:  Continue painting your flowers with the other colors you have chosen, it really doesn't matter if you do perfect looking flower shapes, after the first color I really just kinda haphazardly place the color onto the nail in different spots to balance the look out.

Step Four: Grab your green polish and again thin a blob of it with your acetone and paint it anywhere you have open spaces on the nail.  I would try to avoid overlapping it with the flower colors as much as you can because it can make them look a little muddy. Once you have finished with the leaves you can apply your topcoat.  I like to do the topcoat pretty much right after I am done because it helps to blend the colors even more and gives it a more impressionist style look.

A couple of tips, you should not need very much polish for the flowers and leaves, using the acetone helps because even if the polish gets a bit thick you can still use it since you are thinning it with acetone.  The polish should not be opaque when you are painting the flowers and leaves it should look like watercolors.  If you do feel that you made a mistake you can take your brush and wash it off then dip it into the acetone a lightly brush wear you have messed up and it should take the polish off without removing your base color.

I hope you all like this tutorial and if you have any questions please feel free to leave a comment or e-mail me!


Saturday, May 25, 2013

Abstract Flowers

Hey guys,

I have a fun and super easy nail art look today.  I was loosely inspired by some Revlon nail strips I saw the other day at the store.  I started with an off white base color, for the flowers I took the different colors one at a time and mixed acetone with them and painted roundish splotches on my nails.  I plan on doing a tutorial on this one soon, but it really is so easy and mistake-proof!

Colors used:
Base, OPI My Vampire is Buff
Flowers, Sally Hansen Xtreme Wear Pacific Blue and Bubblegum Pink, Sinful Colors Ruby Ruby, Wet N Wild On a Trip
Leaves, Essie Mojito Madness


Thursday, May 16, 2013

First Timer Mix N Match

Hey guys,

So I am a little obsessed with Essie First Timer, it is just the most perfect green color ever!  Although be warned that topcoat changes the color a little bit, it makes it pull more yellow toned.  Even with topcoat I love the color though.  I wanted to play around with some mix and match nails so this was what I came up with.  For the stripes I used striping tape and for the dots I used one of my dotting tools.

Colors used: Essie First Timer, Orly Stone Cold and Orly Mermaid Tale


Saturday, May 11, 2013

Duo-chrome Striping Tape

Hey guys,

So I decided to play with my Chanel Bel Argus Dupe mani by adding some striping tape designs to it.  I used China Glaze Unpredictable to go along with China Glaze Want My Bawdy.  I don't know how much I like this one.  Using a Duo-chrome made it super hard to photograph the designs.  Anyways I hope you all enjoy!

Colors used: China Glaze Frostbite under China Glaze Want My Bawdy and China Glaze Unpredictable


Monday, May 6, 2013

Tie Dye Nails Tutorial

Hey guys,

I have a tutorial finally!  A couple of weeks ago I posted my Neon Sponging mani and I decided to do a tutorial on it.  I ended up calling them tie dye nails, that is what this technique I think looks like when it is finished and neon sponging was just not such a great name. This is also almost identical to the technique I used for my Thunderstorm Nails the only difference is that in the thunderstorm one I made sure to leave some of my base color showing.  


Products used
Base: OPI My Vampire is Buff
Tie Dye Colors: Color Club Volt of Light, Color Club Pure Energy, and Finger Paints 15 Minutes of Frame
Glitter Top Coat: Is a franken I made with a couple of glitters from Sallys Girl but it is very similar to Sinful Colors Hottie


Step One: You will need 3 different colors, I used neons but any 3 colors will work.  I would recommend colors that will blend together well though. So choosing something like two primary colors and then their secondary color like I did with the yellow, blue and green.  Pink, yellow and orange is another example that would work beautifully.  Next cut up a sponge (really any sponge will work I used the one from my China Glaze Ombre set for this one) make sure the pieces are fairly small so you don't cover your whole nail with one color.  I also would advise using tweezers to hold the sponge since the pieces are so small it makes the job way less messy!

Step Two: Apply a base coat, I just used an off-white for my base because it would really allow the neon colors to pop against it.

Step Three: Begin applying your tie dye colors onto the nail.  As you can see I just pounced the sponge onto random spots on my nails.  Make sure you leave enough room for your other colors!

Step Four: Continue applying your other colors onto the nail, as you can see I made sure to leave enough room to lay down my third color.

Step Five: Finish applying your tie dye colors, you can go back over the colors to get the right opacity and to make sure that none of your base is showing through.  Leave the desing to dry for a minute or two and then top it with a glitter top coat of your choice and then a fast drying top coat over that and you are done!


Monday, April 8, 2013

Tribal Striping Tape

Hey guys,

I played around with my striping tape this weekend and I think I am finally getting the hang of this striping tape!  I love the design I came up with on my middle finger, I think it looks so cool.  

I used OPI My Vampire Is Buff, Essie First Timer and Orly Shine


Wednesday, April 3, 2013

Impressionist Flowers

Hey guys,

I have a really neat mani to show you all today.  I have really been enjoying experimenting with different types of nail art lately, especially things that I would not have thought to try before.  For this look I was inspired by Impressionist paintings, I love Impressionism it probably one of my favorite art movements.  If you are wondering what Impressionism is I suggest you Google it, Monet is probably the most well known Impressionist.  However my favorite would be Edgar Degas, I love his art, I actually did a research paper on him when I was in high school for one of my art classes. 

To achieve the look for this mani I used nail polish thinned out with acetone.  I started with a base of OPI Skull and Glossbones I then used Essie First Timer, Essie In the Cab-ana and China Glaze Turned Up Turquoise thinned with acetone to paint flowerery shapes onto my nails.  I then used Essie Mojito Madness thinned wiht acetone and dotted it around the flower shapes to get a leaf effect.  I am in love with this mani, I wish it would photograph a bit better.  It show too much detail in the photos because of darn macro, but in real life this has lovely blurred look.