Showing posts with label OPI. Show all posts

Thursday, August 1, 2013

Pastel Matte Galaxy Nails

Hey guys,

So sorry I have not been posting much lately, I am going to really try to get some stuff up really soon!  Today I have some nail art inspired by The Nailasaurus yet again, she just has the cutest nail designs I am a little obsessed with her nails at the moment.  She posted a Pastel Galaxy Tutorial about a week ago and I was I knew I had to recreate this mani.  I like the finished design but I was terrible at painting the little stars so please forgive me for how horrible they look.  I hope you enjoy!


Colors used:  Essie Navigate Her (base), China Glaze Lemon Fizz, OPI Do You Lilac It?, China Glaze For Audrey, Zoya Charla, China Glaze Fast Track, white acrylic paint, and Hard Candy Matte-ly In Love


Thursday, July 25, 2013

Fan Brush Tie Dye Nail Art

Hey guys,

So I am not really sure what to call these nail at the moment but I am going with fan brush tie dye for right now.  I am in love with this look and it is so simple it is not even funny.  I got the inspiration for this nail design from a dress I had bought for an event at work.  It had a really pretty blue and pink watercolor look in parts of the fabric and it made me want to try for something like it on my nails.  I started with and off-white base and did two coats of that and top coated it.  I let it dry for about ten minutes then I grabbed a pastel neon blue and pink polish, a fan brush and some pure acetone.  I just placed a big drop of the polish color on a paper plate and then I dipped my fan brush into the acetone and thinned out the polish till it got a watercolor look to it.  I then just randomly dapped the thinned polish onto my nails.  I will probably do a more detailed picture tutorial on these soon so I can explain better how I got this look.  I hope you all enjoy!

Colors used: OPI My Vampire is Buff and my past blue and pink neon frankens


Friday, July 12, 2013

Hawaiian Style Flowers

Hey guys,

I have a super cute flowers to show you all today, these are really pretty and super easy to do.  I used the tutorial my MrCandiipants to do this mani you can find the video  here. Oh and seriously if you have never watched her videos you need to she is super funny and her nail art is kind of epic!  I hope you enjoy

Colors used: OPI Skull and Glossbones, Revlon Top Speed Violet, my neon purple franken, Revlon Top Speed Luxe Laque, Orly Ancient Jade and Avon Nail Wear Pro Olive Green


Tuesday, July 2, 2013

Madeline Poole/Pshiiit Inspired Flowers

Hey guys,

So I was browsing Pshiiit's blog the other day and I saw her post about Madeline Poole's nail art book and one of the looks she had done from it.  I instantly knew I wanted to recreate this look, it was just so cute and looked really simple to do.  I didn't have the exact colors that she used but I tried to go with similar ones because I really thought it was a pretty combo.  Also I may do a tutorial on these flowers because they are very simple and look really cute!


Colors used: OPI My Vampire Is Buff, L'Oreal Sparklicious, my neon pink and orange franken, China Glaze White on White and Orly Glowstick


Monday, July 1, 2013

Fourth of July!

Hey guys,

I have a fun easy Fourth of July mani for everyone today.  I love doing Fourth mani's but I will kinda make myself sick of them after a while haha.  Anyways I wanted to do something simple but glittery and I came up with this combo.  I hope you enjoy!


Colors used: Sinful Colors Endless Blue, OPI Pirouette My Whistle, Zoya Maura and LA Girl Glitter Addict Animate


Thursday, June 27, 2013

Kaboom!

Hey guys,

I have one of the Salon Perfect Neon Collision polishes to show you all today.  This one is Kaboom, it is a dupe for Ninja Polish Floam, it is a neon green and blue matte glitter polish.  I love that a drugstore brand duped such a unique and fun indie polish.  I have wanted Floam for a while but I kinda hate messing with ordering indie polishes so I just avoided getting it.  The Neon Collision collection has a bunch of different neon glitter polishes in different color combos which is great!  I got this one and Shocked (which I will show you all tomorrow probably) because they were the only two polishes that I knew I would personally wear.  When I first tried these out I didn't use a base for them, fyi big mistake, they look a million times better with a        colored polish under them.  I really love the color combo I chose for this one and I can't wait to try more.


Colors used: OPI Did It On Em' and Salon Perfect Kaboom


Tuesday, May 28, 2013

Faded French

Hey guys,

I have a nice twist on a french manicure today.  I have seen some photos of faded french mani's on Pinterest and I have meant to do one for a while now.  Then the other day Nailed It posted a tutorial and it reminded me that I really wanted to try this one out!  The technique for this is the same as any gradient that I do (if you need to check out my tutorial it is here ) although I did way to much white at the tips, so be aware of that when you are doing this.


Colors used: Color Club Get a Clue, Orly Dayglow and OPI I Juggle... Men


Saturday, May 25, 2013

Abstract Flowers

Hey guys,

I have a fun and super easy nail art look today.  I was loosely inspired by some Revlon nail strips I saw the other day at the store.  I started with an off white base color, for the flowers I took the different colors one at a time and mixed acetone with them and painted roundish splotches on my nails.  I plan on doing a tutorial on this one soon, but it really is so easy and mistake-proof!

Colors used:
Base, OPI My Vampire is Buff
Flowers, Sally Hansen Xtreme Wear Pacific Blue and Bubblegum Pink, Sinful Colors Ruby Ruby, Wet N Wild On a Trip
Leaves, Essie Mojito Madness


Friday, May 24, 2013

Seeing Stars

Hey guys,

I have a fun starry mani for you all today.  I used my bigRuby nail tattoos for this look and I really liked how this turned out, this mani reminded me of when I was a kid for some reason.


Colors used: Revlon Top Speed Luxe Lacque, Wet n Wild Sparked (for the thumb only), and OPI I Juggle... Men (I put two coats over all of my nails)


Friday, May 17, 2013

Goldeneye Stripes

Hey guys,

I have an awesome mani for you today!  I am really in love with the look of this one, the gold and blue look so nice together.  For this mani I used a tutorial from The Nailasaurus that I have been wanting to try for a little while now.  Oh also I have changed up the shape of my nails a little bit, I am wanting to grow them out some and the square shape I had just was not working for that.  I went for more oval shape and I am liking the look, just have to work on getting used to shaping them evenly!


Colors used: Orly Luxe (as base), OPI Goldeneye and Essie In the Cab-ana


Monday, May 6, 2013

Tie Dye Nails Tutorial

Hey guys,

I have a tutorial finally!  A couple of weeks ago I posted my Neon Sponging mani and I decided to do a tutorial on it.  I ended up calling them tie dye nails, that is what this technique I think looks like when it is finished and neon sponging was just not such a great name. This is also almost identical to the technique I used for my Thunderstorm Nails the only difference is that in the thunderstorm one I made sure to leave some of my base color showing.  


Products used
Base: OPI My Vampire is Buff
Tie Dye Colors: Color Club Volt of Light, Color Club Pure Energy, and Finger Paints 15 Minutes of Frame
Glitter Top Coat: Is a franken I made with a couple of glitters from Sallys Girl but it is very similar to Sinful Colors Hottie


Step One: You will need 3 different colors, I used neons but any 3 colors will work.  I would recommend colors that will blend together well though. So choosing something like two primary colors and then their secondary color like I did with the yellow, blue and green.  Pink, yellow and orange is another example that would work beautifully.  Next cut up a sponge (really any sponge will work I used the one from my China Glaze Ombre set for this one) make sure the pieces are fairly small so you don't cover your whole nail with one color.  I also would advise using tweezers to hold the sponge since the pieces are so small it makes the job way less messy!

Step Two: Apply a base coat, I just used an off-white for my base because it would really allow the neon colors to pop against it.

Step Three: Begin applying your tie dye colors onto the nail.  As you can see I just pounced the sponge onto random spots on my nails.  Make sure you leave enough room for your other colors!

Step Four: Continue applying your other colors onto the nail, as you can see I made sure to leave enough room to lay down my third color.

Step Five: Finish applying your tie dye colors, you can go back over the colors to get the right opacity and to make sure that none of your base is showing through.  Leave the desing to dry for a minute or two and then top it with a glitter top coat of your choice and then a fast drying top coat over that and you are done!


Monday, April 8, 2013

Tribal Striping Tape

Hey guys,

I played around with my striping tape this weekend and I think I am finally getting the hang of this striping tape!  I love the design I came up with on my middle finger, I think it looks so cool.  

I used OPI My Vampire Is Buff, Essie First Timer and Orly Shine


Wednesday, April 3, 2013

Impressionist Flowers

Hey guys,

I have a really neat mani to show you all today.  I have really been enjoying experimenting with different types of nail art lately, especially things that I would not have thought to try before.  For this look I was inspired by Impressionist paintings, I love Impressionism it probably one of my favorite art movements.  If you are wondering what Impressionism is I suggest you Google it, Monet is probably the most well known Impressionist.  However my favorite would be Edgar Degas, I love his art, I actually did a research paper on him when I was in high school for one of my art classes. 

To achieve the look for this mani I used nail polish thinned out with acetone.  I started with a base of OPI Skull and Glossbones I then used Essie First Timer, Essie In the Cab-ana and China Glaze Turned Up Turquoise thinned with acetone to paint flowerery shapes onto my nails.  I then used Essie Mojito Madness thinned wiht acetone and dotted it around the flower shapes to get a leaf effect.  I am in love with this mani, I wish it would photograph a bit better.  It show too much detail in the photos because of darn macro, but in real life this has lovely blurred look.


Wednesday, March 27, 2013

Thunderstorm Nails

Hey guys,

I found this blog post my Pshiiit and I love how she did the base and I thought I would try something similar.  Mine didn't turn out looking really similar to hers at all but it was what I was inspired by.  This reminds me of thunderstorm clouds, the pictures also do not do this mani justice.  It is darker looking and the glitter looks ten times better in real life. 

For this mani I started with a base of Sally Hansen CSM Gray by Gray (not sure if this one is available anymore since the CSM line was redesigned).  I sponged OPI Do You Lilac It?,  Essie Turquoise and Caicos, and Color Club Get A Clue on random spots on my nails using small cut pieces of cosmetic sponge. I then topped them off with Sally Hansen CSM Snow Globe over the entire nail.  The technique for this mani is similar to doing galaxy nails, however the are some differences so I may post a tutorial on this one for you all.


Wednesday, January 30, 2013

Creamsicle Gradient

Hey guys,

I finally did another gradient!  It feels like I haven't done one in forever, I love doing gradients I think they are so pretty.  I wanted something girly for this one so I went with pink and coral.  I used OPI Pink Friday and Finger Paints Gimme Some Sugar then topped the gradient off with Sinful Colors Pinky Glitter.


Monday, January 7, 2013

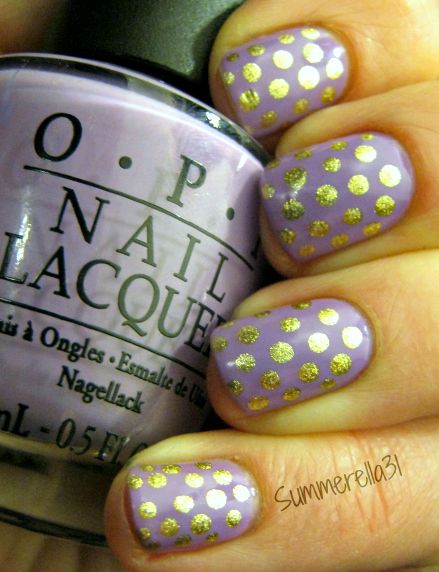
Do You Lilac It? Dotticure

Hey guys,

Sorry for the lack of posts lately, life has been a bit hectic.  I chopped my nails down really short because my middle fingernail on my right hand split and tore.  I hate breaking nails!  Anyways, I have been trying to come up with something cute and fun to do on my nails but I am feeling a little uninspired lately.  I went with a dotticure because it's easy and looks cute.

I used OPI Do You Lilac It? and Orly Luxe


Wednesday, January 2, 2013

Happy New Year!

Hey guys,

Hope everyone had a safe and happy New Year.  I have my very first mani of 2013 to show today.  I had done a different mani for New Years Eve and it got destroyed before I could get any pictures of it, so I did this one yesterday.  I love feather mani's they always looks so delicate and pretty!

I used OPI Skull and Glossbones, China Glaze Polarized, Wet N Wild I Need a Refresh-Mint and an Amuse white nail art pen.


Sunday, December 30, 2012

Girly

Hey guys,

I have got a cute new Revlon polish today.  Seriously I am loving some of the polishes they have been making lately, especially their glitters!  I picked up this one (Girly), Heavenly and their new matte top coat.  I will probably be doing a mani with Heavenly next and I tried out the matte topcoat and it is great.  I did a coat of Sally Hansen Bubblegum Pink and then 2 coats of Girly.  This polish is exactly what the name says it is, it a pale pink jelly base with pink, magenta and purple glitter.  It is pretty gritty and I used Seche Vite then a coat of OPI I Juggle...Men to smooth it out.


Thursday, December 27, 2012

Palette Cleanser

Hey guys,

I have a nice palette cleansing mani today.  After all the Holiday glitter bombs and nail art I needed something refreshing.  I love the look of these two polishes together.  It is very soft and subtle, but still has a fun element to it with the glitter.


I used OPI Bubble Bath and Nina Ultra Pro Holographic Topcoat


Thursday, December 13, 2012

Cross Accent Nail

Hey guys,

I had no idea what to call this one haha. I found a pic somewhere (Pinterest, Beautylish, Instagram?) that inspired this mani, but I cannot find it anywhere!  It was pink and had a gold cross accent with gold hex glitter.   If you know who did it or have seen this mani somewhere please let me know.  Anyways, I was feeling a vampy color so I went with OPI Every Month is Oktoberfest and then used Milani Jewel FX Gold for the cross.  Sorry my cross kind of sucks, I need to practice this more.